春天DATA的Neo4j - 示例
在本章中,我们将讨论如何开发一个Spring框架项目,Neo4j的数据库工作。
春天DATA Neo4j的模块注释
我们将使用下面的Spring框架注解开发这个应用程序。
| S.No. | 春天DATA Neo4j的注解 | 用法 |
|---|---|---|
| 1。 | @GraphEntity | 要定义域类的Neo4j实体 |
| 2。 | @GraphID | 要定义节点或关系ID |
| 3。 | @GraphProperty | 要定义节点或关系属性 |
开发应用之前,请参阅“Neo4j的春天数据环境设置”一章中设置的Maven的Eclipse IDE项目。
简要步骤来实现Spring数据Neo4j的应用 -
开发图形实体或域或POJO类
制定DAO或库
发展服务层(如需要)
春天DATA Neo4j的XML配置
现在,我们演示了如何开发Eclipse IDE中基于Maven的春天数据应用来执行Neo4j的数据库操作。
开发图形实体或域或POJO类
我们要实现equals()和hashCode()方法。
不要求提供“ID”属性setter方法,因为Neo4j的将分配这个属性的护理
package com.tp.springdata.neo4j.domain;import org.springframework.data.neo4j.annotation.GraphId;
import org.springframework.data.neo4j.annotation.NodeEntity;@NodeEntity
public class GoogleProfile {   @GraphId Long id;
   private String name;
   private String address;
   private String sex;
   private String dob;   public Long getId() {
      return id;
   }

   public String getName() {
      return name;
   }

   public void setName(String name) {
      this.name = name;
   }

   public String getAddress() {
      return address;
   }

   public void setAddress(String address) {
      this.address = address;
   }

   public String getSex() {
      return sex;
   }

   public void setSex(String sex) {
      this.sex = sex;
   }

   public String getDob() {
      return dob;
   }

   public void setDob(String dob) {
      this.dob = dob;
   }

   public boolean equals(Object other) {

      if (this == other)
         return true;      if (id == null)
         return false;      if (! (other instanceof GoogleProfile))
         return false;      return id.equals(((GoogleProfile) other).id);
   }

   public int hashCode() {
      return id == null ? System.identityHashCode(this) : id.hashCode();
   }

   public String toString(){
      return "Profile[id:"+ id +",name:"+ name +",sex:" + sex+ ",address:" + address + ",dob:" + dob +"]";
   }
}
@GraphProperty是可选的,所以我们可以忽略这一点。 上述实体是下同。
package com.tp.springdata.neo4j.domain;import org.springframework.data.neo4j.annotation.GraphId;
import org.springframework.data.neo4j.annotation.NodeEntity;@NodeEntity
public class GoogleProfile {   @GraphId
   private Long id;   private String name;
   private String address;
   private String sex;
   private String dob;   // Getter for id
   // Setters and Getters for rest of properties
   // implement equals() and hashCode() methods
}
发展春天DATA Neo4j的存储库。
正如我们前面所讨论的,我们需要通过扩展Spring数据Neo4j的API接口“GraphRepository”,而不是要求其实施开发唯一接口。
春季数据的Neo4j将采取内部该接口提供实现的照顾。
定义我们的领域类的储存库或DAO接口:GoogleProfile
package com.tp.springdata.neo4j.dao;import org.springframework.data.neo4j.repository.GraphRepository;public interface GoogleProfileRepository extends GraphRepository<GoogleProfile>{
}
这是很容易和简单的实现Spring DAT Neo4j的存储库。 我们只需要通过GraphRepository通过指定我们的领域类作为参数延伸到定义一个接口。
发展服务层工件:接口和实现。
这是很好的做法,提供我们的DAO层之上的应用服务层。
服务构件
服务组件接口:
package com.tp.springdata.neo4j.service;import org.springframework.data.neo4j.conversion.Result;
import com.tp.springdata.neo4j.domain.GoogleProfile;public interface GoogleProfileService {   GoogleProfile create(GoogleProfile profile);
   void delete(GoogleProfile profile);
   GoogleProfile findById(long id);
   Result<GoogleProfile> findAll();
}
服务组件的实现:
package com.tp.springdata.neo4j.service;import org.springframework.beans.factory.annotation.Autowired;
import org.springframework.data.neo4j.conversion.Result;
import org.springframework.stereotype.Service;import com.tp.springdata.neo4j.dao.GoogleProfileRepository;
import com.tp.springdata.neo4j.domain.GoogleProfile;@Service("googleProfileService")
public class GoogleProfileServiceImpl implements GoogleProfileService {   @Autowired
   private GoogleProfileRepository googleProfileRepository;	   public GoogleProfile create(GoogleProfile profile) {
      return googleProfileRepository.save(profile);
   }   public void delete(GoogleProfile profile) {
      googleProfileRepository.delete(profile);
   }   public GoogleProfile findById(long id) {
      return googleProfileRepository.findOne(id);
   }   public Result<GoogleProfile> findAll() {
      return googleProfileRepository.findAll();
   }
}
春天DATA Neo4j的XML配置
要运行基于Spring的应用程序,我们需要提供一些XML配置。
我们需要提供Spring XML配置文件的详细信息如下
春天提供的数据Neo4j的命名空间
xmlns:neo4j=http://www.springframework.org/schema/data/neo4j
春天提供的数据Neo4j的架构定义(XSD文件)
xsi:schemaLocation="http://www.springframework.org/schema/data/neo4j http://www.springframework.org/schema/data/neo4j/spring-neo4j.xsd"
弹簧neo4j.xsd文件包含所有数据春季相关Neo4j的XML标记
为广大的Neo4j数据库的位置和我们的图形实体(域或POJO类)基础包
<neo4j:config storeDirectory="C:\TPNeo4jDB" base-package="com.tp.springdata.neo4j.domain"/?>
这里storeDirectory =“C:\ TPNeo4jDB”指定我们的Neo4j数据库文件存储在C:\ TPNeo4jDB位置在我们的文件系统。
基本套餐=“com.tp.springdata.neo4j.domain”
我们所有的图形实体在我们的应用程序的classpath com.tp.springdata.neo4j.domain为基础包
为我们的春节数据Neo4j的存储库(DAO接口)的基本软件包。
<neo4j:repositories base-package="com.tp.springdata.neo4j.dao"/?>
我们所有的春天数据Neo4j的库可在com.tp.springdata.neo4j.dao包在我们的应用程序的类路径
提供Spring的配置与Spring IoC容器注册注释组件。
<context:component-scan base-package="com.tp.springdata.neo4j.service" /?>
我们所有的组件或服务都可以在我们的应用程序类路径“com.tp.springdata.neo4j.service”包
完成“googleprofile.xml”
<?xml version="1.0" encoding="UTF-8" standalone="no"?>
<beans xmlns="http://www.springframework.org/schema/beans"
   xmlns:context="http://www.springframework.org/schema/context"
   xmlns:xsi="http://www.w3.org/2001/XMLSchema-instance"
   xmlns:neo4j="http://www.springframework.org/schema/data/neo4j"
   xmlns:tx="http://www.springframework.org/schema/tx"
   xsi:schemaLocation="
      http://www.springframework.org/schema/beans
      http://www.springframework.org/schema/beans/spring-beans.xsd
      http://www.springframework.org/schema/context
      http://www.springframework.org/schema/context/spring-context.xsd
      http://www.springframework.org/schema/data/neo4j
      http://www.springframework.org/schema/data/neo4j/spring-neo4j.xsd
      http://www.springframework.org/schema/tx
      http://www.springframework.org/schema/tx/spring-tx.xsd">   <context:component-scan base-package="com.tp.springdata.neo4j.service" />   <neo4j:config storeDirectory="C:\TPNeo4jDB"
      base-package="com.tp.springdata.neo4j.domain"/>   <neo4j:repositories base-package="com.tp.springdata.neo4j.dao"/>   <tx:annotation-driven />
</beans>
开发测试程序和测试所有操作
import java.util.Iterator;import org.springframework.context.ApplicationContext;
import org.springframework.context.support.ClassPathXmlApplicationContext;
import org.springframework.data.neo4j.conversion.Result;import com.tp.springdata.neo4j.service.GoogleProfileService;
import com.tp.springdata.neo4j.domain.GoogleProfile;public class GoogleProfileTest {
   public static void main(String[] args) {
      ApplicationContext context = new ClassPathXmlApplicationContext("googleprofile.xml");
      GoogleProfileService service = (GoogleProfileService) context.getBean("googleProfileService");      // Please uncomment one of the operation section
      // and comment remaining section to test only one operation at a time
      // Here I've uncommented CREATE operation and
      // commented other operations: FIND ONE, FIND ALL, DELETE
      // CREATE Operation
      GoogleProfile profile = createPofile();
      createProfile(service,profile);
      System.out.println("GoogleProfile created successfully.");      // FIND ONE
      /*
      GoogleProfile profile = getOneProfileById(service,67515L);
      System.out.println(profile);
      */      // FIND ALL
      /*
      getAllProfiles(service);
      */      // DELETE
      /*
      GoogleProfile profile = createPofile();
      deleteProfile(service,profile);
      System.out.println("GoogleProfile deleted successfully.");
      */
   }

   private static GoogleProfile createProfile(GoogleProfileService service, GoogleProfile profile){
      return service.create(profile);
   }

   private static void deleteProfile(GoogleProfileService service,GoogleProfile profile){
      service.delete(profile);
   }

   private static GoogleProfile getOneProfileById(GoogleProfileService service,Long id){
      return service.findById(id);
   }

   private static void getAllProfiles(GoogleProfileService service){
      Result<GoogleProfile> result = service.findAll();
      Iterator<GoogleProfile> iterator = result.iterator();

      while(iterator.hasNext()){
         System.out.println(iterator.next());
      }
   }

   private static GoogleProfile createPofile(){
      GoogleProfile profile = new GoogleProfile();
      profile.setName("Profile-2");
      profile.setAddress("Hyderabad");
      profile.setSex("Male");
      profile.setDob("02/02/1980");
      return profile;
   }
}
我注释掉只为创建操作和评论3运营休息。
如果你想测试等作业,突出部分评论不必要的部分并取消部分想和测试该应用程序
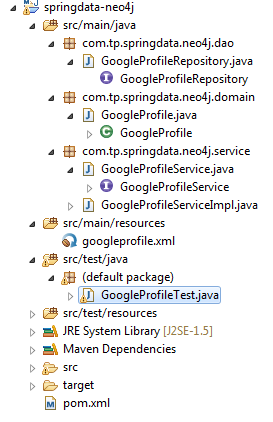
最终的Eclipse Maven项目结构
注意:-
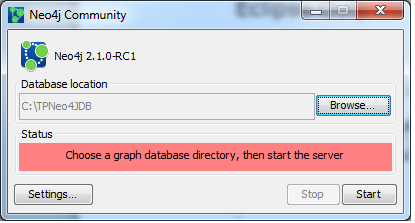
当我们运行这个程序,请确保我们的Neo4j数据库服务器应该在SHUTDOWM状态。
执行这个Java程序之前,请检查您的Neo4j处于关断模式或没有。 如果没有,请点击“停止”按钮摊牌吧。
运行GoogleProfileTest.java应用程序,并查看结果
当我们在Eclipse IDE中运行此创建操作,我们可以在控制台中看到以下消息。

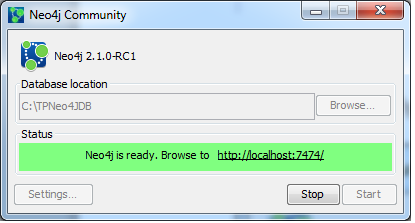
在执行某些操作后,再点击“Start”按钮开始Neo4j的数据库服务器
通过使用HTTP打开Neo4j的数据浏览器://本地主机:7474 / URL
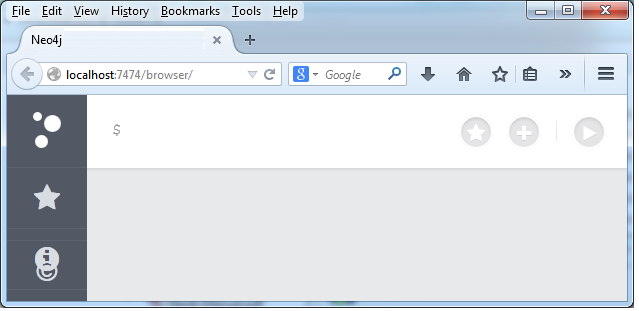
键入数据浏览器下面的命令
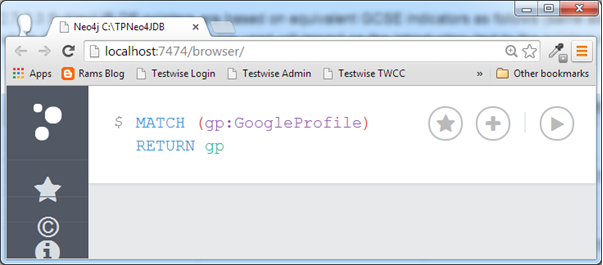
点击“执行”按钮并观察结果
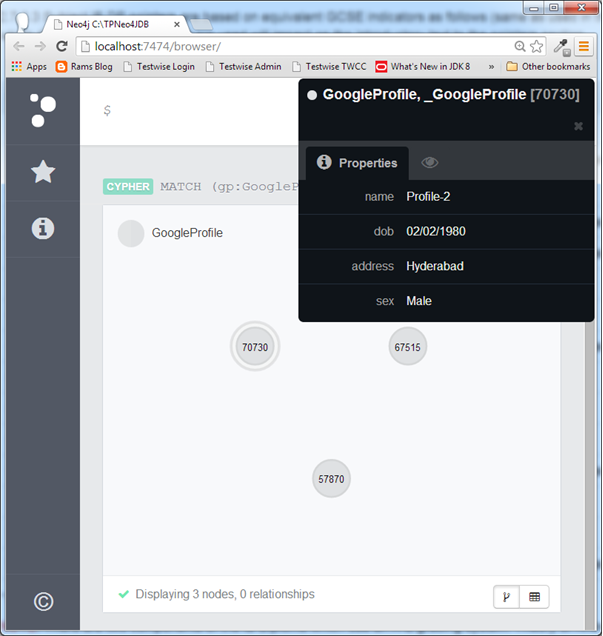
到目前为止,我们已经创建了3 GoogleProfile节点。